Automated Repo Setup
Setup & Run
Install NodeJs (version >= 12.0.0) which is required to run this tool. NodeJs can be acquired on the website nodejs.org.
To use this tool you have to clone the repository to your local drive.
This tool uses several libraries in order to use the Gitlab API etc. Install these libraries by running the command
npm installin the root folder of this project.Local/GitLab usage
- For local use only
- Copy the origin repository into the folder resources/test/input. If this folder does not exist, create the folder test inside the resources folder and then create the folder input in the newly created folder test
- The generated repositories will be located under resources/test/output after running the tool
- For use with Gitlab:
- Navigate to https://git.st.archi-lab.io/profile/personal_access_tokens (if you are using the gitlab instance * git.st.archi-lab.io*) and generate an Access Token / API-Token in order to get access to the gitlab api
- Copy the Access Token
- Rename the file .env.example to .env
- Open .env and replace YOUR_API_TOKEN with the token you copied.
- Configure the source repository and target group in the config
- For local use only
Before you can configure or run this tool you have to copy all the example config files inside the * resources/examples/config* folder to the resources/config folder in order to create your own config files. If you want to change the standard behaviour you can configure this tool by editing the configs.
To run the application navigate into the root folder of this tool and run
npm start. The repositories will now be generated.
Configuration
Before you can configure this tool you have to copy all the relevant example config files inside the * resources/examples/config* folder to the resources/config folder in order to create your own config files. If you want to change the standard behaviour you can configure this tool by editing the configs.
The Divekit uses two types of configs, technical configs and domain specific configs. The contents of technical configs often change each time repositories are generated using the Divekit. Therefore these type of configs are located in the resources/config folder of the Divekit. Domain configs do not change each time new repositories are generated because they depend on the type of exercise and the corresponding domain. As a result these configs should be contained in the Origin Project (they dont have to). In the following the different configs, their purpose and their type are listed:
| Config | Purpose | Type |
|---|---|---|
| repositoryConfig | Configure the process of repository generation | Technical Config |
| originRepositoryConfig | Configure solution deletion and variable warnings | Domain Config |
| variationsConfig | Configure different types of variations | Domain Config |
| variableExtensionsConfig | Configure different extensions which are used to generate derivated variables | Domain Config |
| relationsConfig | Configure properties of relations which are used to generate relation variables | Domain Config |
Features
Repository Generation
If the Divekit is run the tool will generate repositories based on the configured options defined in the * repositoryConfig*. The following example shows the relevant options where each option is explained in short:
{
    "general": {
        # Decide wheather you just want to test locally. If set to false the Gitlab api will be used
        "localMode": true,

        # Decide wheather test repositories should be generated as well. If set to false there will only be generated one code repository for each learner
        "createTestRepository": true,

        # Decide wheather the repositories should be randomized using the *variationsConfig.json*
        "variateRepositories": true,

        # Decide wheather the existing solution should be deleted using the SolutionDeleter
        "deleteSolution": false,

        # Activate warnings which will warn you if there are suspicious variable values remaining after variable placeholders have been replaced
        "activateVariableValueWarnings": true,

        # Define the number of concurrent repository generation processes. Keep in mind that high numbers can overload the Gitlab server if localMode is set to false
        "maxConcurrentWorkers": 1

        # Optional flag: set the logging level. Valid values are "debug", "info", "warn", "error" (case insensitive). Default value is "info".
        "globalLogLevel": "debug"
    },
    "repository": {
        # The Name of the repositories. Multiple repositories will be named <repositoryName>_group_<uuid>, <repositoryName>_tests_group_<uuid> ...
        "repositoryName": "st2-praktikum",

        # The number of repositories which will be created. Only relevant if there were no repositoryMembers defined
        "repositoryCount": 0,

        # The user names of the members which get access to repositories
        "repositoryMembers": [
            ["st2-praktikum"]
        ]
    },
    "local": {
        # The file path to an origin repository which should be used for local testing
        "originRepositoryFilePath": ""
    },
    "remote": {
        # Id of the repository you want to clone
        "originRepositoryId": 1012,

        # The ids of the target groups where all repositories will be located
        "codeRepositoryTargetGroupId": 161,
        "testRepositoryTargetGroupId": 170,

        # If set to true all existing repositories inside the defined groups will be deleted
        "deleteExistingRepositories": false,

        # Define wheather users are added as maintainers or as quests
        "addUsersAsGuests": false
    }
}
If localMode is set to true the application will only generate possible variable variations and randomize files based on a folder which contains the origin repository. This folder should be located in the folder resources/test/input. If the folder resources/test/input does not exist create it within the root folder of this tool or run the tool once in test mode which will generate this folder automatically. This can be used to get an idea which repositories will result based on the configs. The following example shows the location of the origin folder:
root_of_tool
    - build
    - node_modules
    - src
    - .gitignore
    - .Readme
    - resources
        - test
            - input
                - origin-folder
                    - src
                    - .gitignore
                    - .Readme
If you dont want to copy the origin repository each time you want to test a new version specify the file path to the origin repository in the config under local.originRepositoryFilePath.
Partially repository generation
While running the automated-repo-setup in local mode you have the option to partially generate repositories.
To do so, just configure the repositoryConfig.json* as such:
{
    "general": {
        "localMode": true
    },
    "local": {
        "subsetPaths": [
          "README.md",
          "path/to/malfunction/file.eof"
        ]
    }
}
*only partially shown
Start generation
npm start
Generated files are located under: resources/output/
File Assignment
Although code and test files are separeted into two repositories the exercise only consists of one repository called the origin. It would be really troublesome if you would have to update two repositories all the time while creating a new exercise. Because of that there has to be a way to determine wheather a file has to be copied to the code project, the test project or both. If you want some files to only be copied to a specific repository you can express this behaviour in the filename.
- If the filename contains the string _coderepo the file will only be copied to the code repository.
- If the filename contains the string _testrepo the file will only be copied to the test repository.
- If the filename contains the string _norepo the file will not be copied to the repositories. This can be used to store config files from this tool directly in the origin repository.
- If the filename contains none of those the file will be copied to both repositories.
File Converter
If you want to convert or manipulate certain repository files during the repository generation process File Converters (File Manipulators) can be used. Currently there is only one type of File Manipulator available. Additional converters can be easily added by extending the codebase of the Divekit. The already existing File Manipulartor is called UmletFileManipulator. This manupulator is used to convert the individualized xml representations of Umlet diagrams to image formats. This convert step can not be skipped because it is not possible to replace variables in image representations of umlet diagrams. Therefore the process of individualizing UML diagrams created with umlet is as follows:
UML diagram with placeholder variables (xml) -> UML diagram with already replaced content (xml) -> UML diagram with already replaced content (image file format)
Test Overview
To give an overview on passed and failed tests of a repository a test overview page will be generated using the project report-mapper and report-visualizer. The tools are called within the " .gitlab-ci.yml" file in the deploy stage.
Repository Overview
If you have the generation of the overview table enabled in the repositoryConfig the destination and the name of the overview table can be defined in the file repositoryConfig as well:
{
    "overview": {
        "generateOverview": true,
        "overviewRepositoryId": 1018,
        "overviewFileName": "st2-praktikum"
    }
}
Given the config shown above a markdown file will be generated which includes a summary of all generated repositories and their members. After that the file will be uploaded to the configured repository:
Solution Deletion
If you want solutions which are contained in your origin project to be removed while creating the code and test repositories enable solution deletion in the repositoryConfig. The originRepositoryConfig specifies the keywords which are used to either
- delete a file
- delete a paragraph
- replace a paragraph
This can be shown best with an example:
// TODO calculate the sum of number 1 and number 2 and return the result
public static int sumInt(int number1, int number2) {
    //unsup
    return number1 + number2;
    //unsup
}

// TODO calculate the product of number 1 and number 2 and return the result
public static int multiplyInt(int number1, int number2) {
    //delete
    return number1 * number2;
    //delete
}
will be changed to:
// TODO calculate the sum of number 1 and number 2 and return the result
public static int sumInt(int number1, int number2) {
    throw new UnsupportedOperationException();
}

// TODO calculate the product of number 1 and number 2 and return the result
public static int multiplyInt(int number1, int number2) {

}
The corresponding config entry in the originRepositoryConfig would be:
{
    "solutionDeletion": {
        "deleteFileKey": "//deleteFile",
        "deleteParagraphKey": "//delete",
        "replaceMap": {
            "//unsup": "throw new UnsupportedOperationException();"
        }
    }
}
A file containing the string “//deleteFile” would be deleted.
Individualization
If you want your project to be randomized slightly use the configuration files variationsConfig.json, * variableExtensionsConfig* and relationsConfig to create variables. Variables can be referenced later by their name encapsulated in configured signs. e.g.: $ThisIsAVariable$.
Variable Generation
There are three types of variables:
Object Variables
Object Variables are used to randomize Entities and Value Objects. Such variables are created by defining one or multiple ids and an array of possible object variations. Object variations can contain attributes which will later be transformed into a variable. An example attribute could be Class which contains the class name of an entity. Keep in mind that attributes can not only be limited to a single primitive value but can only be expressed as a new object inside the json. The following json shows a possible declaration of two object variations inside the variationsConfig:
{
 "ids": "Vehicle",
 "objectVariations": [
   {
     "id": "Car",
     "Class": "Car",
     "RepoClass": "CarRepository",
     "SetToOne": "setCar",
     "SetToMany": "setCars"
   },
   {
     "id": "Truck",
     "Class": "Truck",
     "RepoClass": "TruckRepository",
     "SetToOne": "setTruck",
     "SetToMany": "setTrucks"
   },
   {
     "id": "Train",
     "Class": "Train",
     "RepoClass": "TrainRepository",
     "SetToOne": "setTrain",
     "SetToMany": "setTrains"
   }
 ],
 "variableExtensions": [
   "Getter"
 ]
},
{
"ids": ["Wheel1", "Wheel2"],
"objectVariations": [
{
"id": "FrontWheel",
"Class": "FrontWheel",
"RepoClass": "FrontWheelRepository",
"SetToOne": "setFrontWheel",
"SetToMany": "setFrontWheels"
},
{
"id": "BackWheel",
"Class": "BackWheel",
"RepoClass": "BackWheelRepository",
"SetToOne": "setBackWheel",
"SetToMany": "setBackWheels"
}
],
"variableExtensions": ["Getter"]
}
The defined object variations are now randomly assigned to the variables Vehicle, Wheel1 and Wheel2. The following dictionary shows variables which result from above declaration:
VehicleClass: 'Truck',
VehicleRepoClass: 'TruckRepository',
VehicleGetToOne: 'getTruck',
VehicleGetToMany: 'getTrucks',
VehicleSetToOne: 'setTruck',
VehicleSetToMany: 'setTrucks',
Wheel1Class: 'Backwheel',
Wheel1RepoClass: 'BackwheelRepository',
Wheel1GetToOne: 'getBackWheel',
Wheel1GetToMany: 'getBackWheels',
Wheel1SetToOne: 'setBackWheel',
Wheel1SetToMany: 'setBackWheels',
Wheel2Class: 'FrontWheel',
Wheel2RepoClass: 'FrontWheelRepository',
Wheel2GetToOne: 'getFrontWheel',
Wheel2GetToMany: 'getFrontWheels',
Wheel2SetToOne: 'setFrontWheel',
Wheel2SetToMany: 'setFrontWheels'
In the example above you can see that some variables could be derived from already existing variables. The setter variables are a perfect example for this. Such variables can also be defined through variable extensions. This is done for the getter variables in the example. Two steps are required to define such derived variables:
- Define a rule for a variable extension in the config variableExtensionsConfig.json:
{
 "id": "Getter",
 "variableExtensions": {
   "GetToOne": {
     "preValue": "get",
     "value": "CLASS",
     "postValue": "",
     "modifier": "NONE"
   },
   "GetToMany": {
     "preValue": "get",
     "value": "PLURAL",
     "postValue": "",
     "modifier": "NONE"
   }
 }
}
The value attribute references an already existing variable which is modified through the given modifier. Valid modifiers can for example convert the given variable to an all lower case variant.
The resulting value is then concatenated with the preValue and postValue like so: preValue + modifier(value) + postValue.
- Define a certain variable extension for an object by adding the id of the variable extension to the list of variable extensions of an object (see example above).
Relation Variables
Relation Variables are used to randomize relations between entities. They are defined by declaring an array of * relationships* and an array of relationObjects inside the variationsConfig. Both arrays must be of equal length because each set of relationObjects will be assigned to an relationShip.
In order to define a relationShip you have to provide an id and a reference to an relationShip type. These types are defined in the file relationsConfig and can contain any kind of attributes:
{
 "id": "OneToOne",
 "Umlet": "lt=-\nm1=1\nm2=1",
 "Short": "1 - 1",
 "Description": "one to one"
}
In order to define a set of relationObjects you have to provide an id and two object references. The following json shows an example definition for relations:
{
 "relationShips": [
   {
     "id": "Rel1",
     "relationType": "OneToOne"
   },
   {
     "id": "Rel2",
     "relationType": "OneToMany"
   }
 ],
 "relationObjects": [
   {
     "id": "RelVehicleWheel1",
     "Obj1": "Vehicle",
     "Obj2": "Wheel1"
   },
   {
     "id": "RelVehicleWheel2",
     "Obj1": "Vehicle",
     "Obj2": "Wheel2"
   }
 ]
}
For each relationship two kind of variables will be generated.
One kind of variable will clarify which objects belong to a certain relationship. These variables will start with for example Rel1 as defined in the section relationShips.
Another kind of variable will clarify which relationship belongs to a set of objects. These variables will start with for example RelVehicleWheel1 as defined in the section relationObjects.
For each of these two kinds a set of variables will be gernated. The first set contains attributes of the relation types defined in the relationsConfig. The other set contains attributes of the objects defined in the variationsConfig.
The following json shows a set of variables which will be generated for a single relationship:
Rel1_Umlet: 'lt=-\nm1=1\nm2=1',
Rel1_Short: '1 - 1',
Rel1_Description: 'one to one',
Rel1_Obj1Class: 'Truck',
Rel1_Obj1RepoClass: 'TruckRepository',
Rel1_Obj1GetToOne: 'getTruck',
Rel1_Obj1GetToMany: 'getTrucks',
Rel1_Obj1SetToOne: 'setTruck',
Rel1_Obj1SetToMany: 'setTrucks',
Rel1_Obj2Class: 'Backwheel',
Rel1_Obj2RepoClass: 'BackwheelRepository',
Rel1_Obj2GetToOne: 'getBackWheel',
Rel1_Obj2GetToMany: 'getBackWheels',
Rel1_Obj2SetToOne: 'setBackWheel',
Rel1_Obj2SetToMany: 'setBackWheels',

RelVehicleWheel1_Umlet: 'lt=-\nm1=1\nm2=1',
RelVehicleWheel1_Short: '1 - 1',
RelVehicleWheel1_Description: 'one to one',
RelVehicleWheel1_Obj1Class: 'Truck',
RelVehicleWheel1_Obj1RepoClass: 'TruckRepository',
RelVehicleWheel1_Obj1GetToOne: 'getTruck',
RelVehicleWheel1_Obj1GetToMany: 'getTrucks',
RelVehicleWheel1_Obj1SetToOne: 'setTruck',
RelVehicleWheel1_Obj1SetToMany: 'setTrucks',
RelVehicleWheel1_Obj2Class: 'Backwheel',
RelVehicleWheel1_Obj2RepoClass: 'BackwheelRepository',
RelVehicleWheel1_Obj2GetToOne: 'getBackWheel',
RelVehicleWheel1_Obj2GetToMany: 'getBackWheels',
RelVehicleWheel1_Obj2SetToOne: 'setBackWheel',
RelVehicleWheel1_Obj2SetToMany: 'setBackWheels',
Logic variables
Logic Variables are used to randomize logic elements of an exercise. The idea behind this concept is that you can define multiple groups of business logic, but only one group of business logic is assigned to each individual exercise. Logic variables can also be used to define text which decribes a certain business logic. Here is an example for the definition of logic variables:
{
  "id": "VehicleLogic",
  "logicVariations": [
    {
      "id": "VehicleCrash",
      "Description": "Keep in mind that this text is just an example. \nThis is a new line"
    },
    {
      "id": "VehicleShop",
      "Description": "The Vehicle Shop exercise was selected"
    }
  ]
}
Above example will generate only one variable which is called VehicleLogicDescription. The interesting part of the logic variations are the ids. If you add an underscore followed by such an id to the end of a file this file is only inserted into an individual repository if the said id was selected during the randomization.
e.g.: The file VehicleCrashTest_VehicleCrash.java is only inserted if the logic VehicleCrash was selected. The file VehicleShopTest_VehicleShop.java is only inserted if the logic VehicleShop was selected.
This can be used to dynamically insert certain test classes which test a specific business logic. If a certain test class was not inserted to an individual repository the one who solves this exercise does not have to implement the corresponding business logic.
Variable Post Processing
Often variable values are needed not only in capital letters but also in lower case format. Therefore for each generated variable there will be three different types generated:
The first type is the variable itselt without further changes e.g.: VehicleClass -> MonsterTruck
The second type sets the first char to lower case e.g.: vehicleClass -> monsterTruck
The third type sets all chars to lower case e.g.: vehicleclass -> monstertruck
Variable Replacement
In the process of repository individualization all defined variables will be replaced in all the origin repository files with their corresponding value. Typically every variable which should be replaced is decorated with a specific string at the start and the end of the variable e.g: $VehicleClass$ or xxxVehicleClassxxx. This string helps identifying variables. If needed this string can be set to an empty string. In this case the variable name can be inserted in specific files without futher decoration. This can lead to problems in terms of variable replacement so that the Divekit will take certain measures to ensure that all variables are replaced correctly. This decoration string can be configured in the originRepositoryConfig:
{
    "variables": {
        "variableDelimeter": "$"
    }
}
Variable Value Warnings
If this feature is activated within the repositoryConfig the tool will spit out warnings which will inform you if there are suspicious variable values remaining after variable placeholders have been replaced. If for example a learner has to solve an exercise which contains Trucks instead of Cars (see config above) then the solution of this leaner should not contain variable values like “Car”, “CarRepository”, “setCar” or “setCars”. In the originRepositoryConfig you can define a whitelist of file types which should be included in the warning process.
Additionally an ignoreList can be configured. If a variable value is contained in one of the defined values inside the ignoreList this specific variable value will not trigger a warning. In addition, the ignoreFileList can contain filenames which should be completely excluded from the warning process.
The following json is an example for the discussed configurable options:
{
    "warnings": {
        "variableValueWarnings": {
            "typeWhiteList": [
                "json",
                "java",
                "md"
            ],
            "ignoreList": [
                "name",
                "type"
            ],
            "ignoreFileList": [
                "individualizationCheck_testrepo.json",
                "variationsConfig_testrepo.json",
                "IndividualizationTest_testrepo.java"
            ]
        }
    }
}
Individual Repository Persist
If you run the tool the default behaviour is that it will generate individual variables for each repository which is specified in the repositoryConfig. If you want to reuse already generated variables you can set " useSavedIndividualRepositories" to “true” and define a file name under “savedIndividualRepositoriesFileName”. The file name is relative to the folder “resources/individual_repositories”. These options are defined in the repositoryConfig:
{
    "individualRepositoryPersist": {
        "useSavedIndividualRepositories": true,
        "savedIndividualRepositoriesFileName": "individual_repositories_22-06-2021 12-58-31.json"
    }
}
A single entry in such an individual repositories file can be edited with a normal text editor and could look like this:
{
    "id": "67e6be38-ae36-4fbf-9d03-0993d97f7559",
    "members": [
        "user1"
    ],
    "individualSelectionCollection": {
        "individualObjectSelection": {
            "Vehicle": "Truck",
            "Wheel1": "BackWheel",
            "Wheel2": "FrontWheel"
        },
        "individualRelationSelection": {
            "Rel1": "RelVehicleWheel2",
            "Rel2": "RelVehicleWheel1"
        },
        "individualLogicSelection": {
            "VehicleLogic": "VehicleCrash"
        }
    }
}
Components
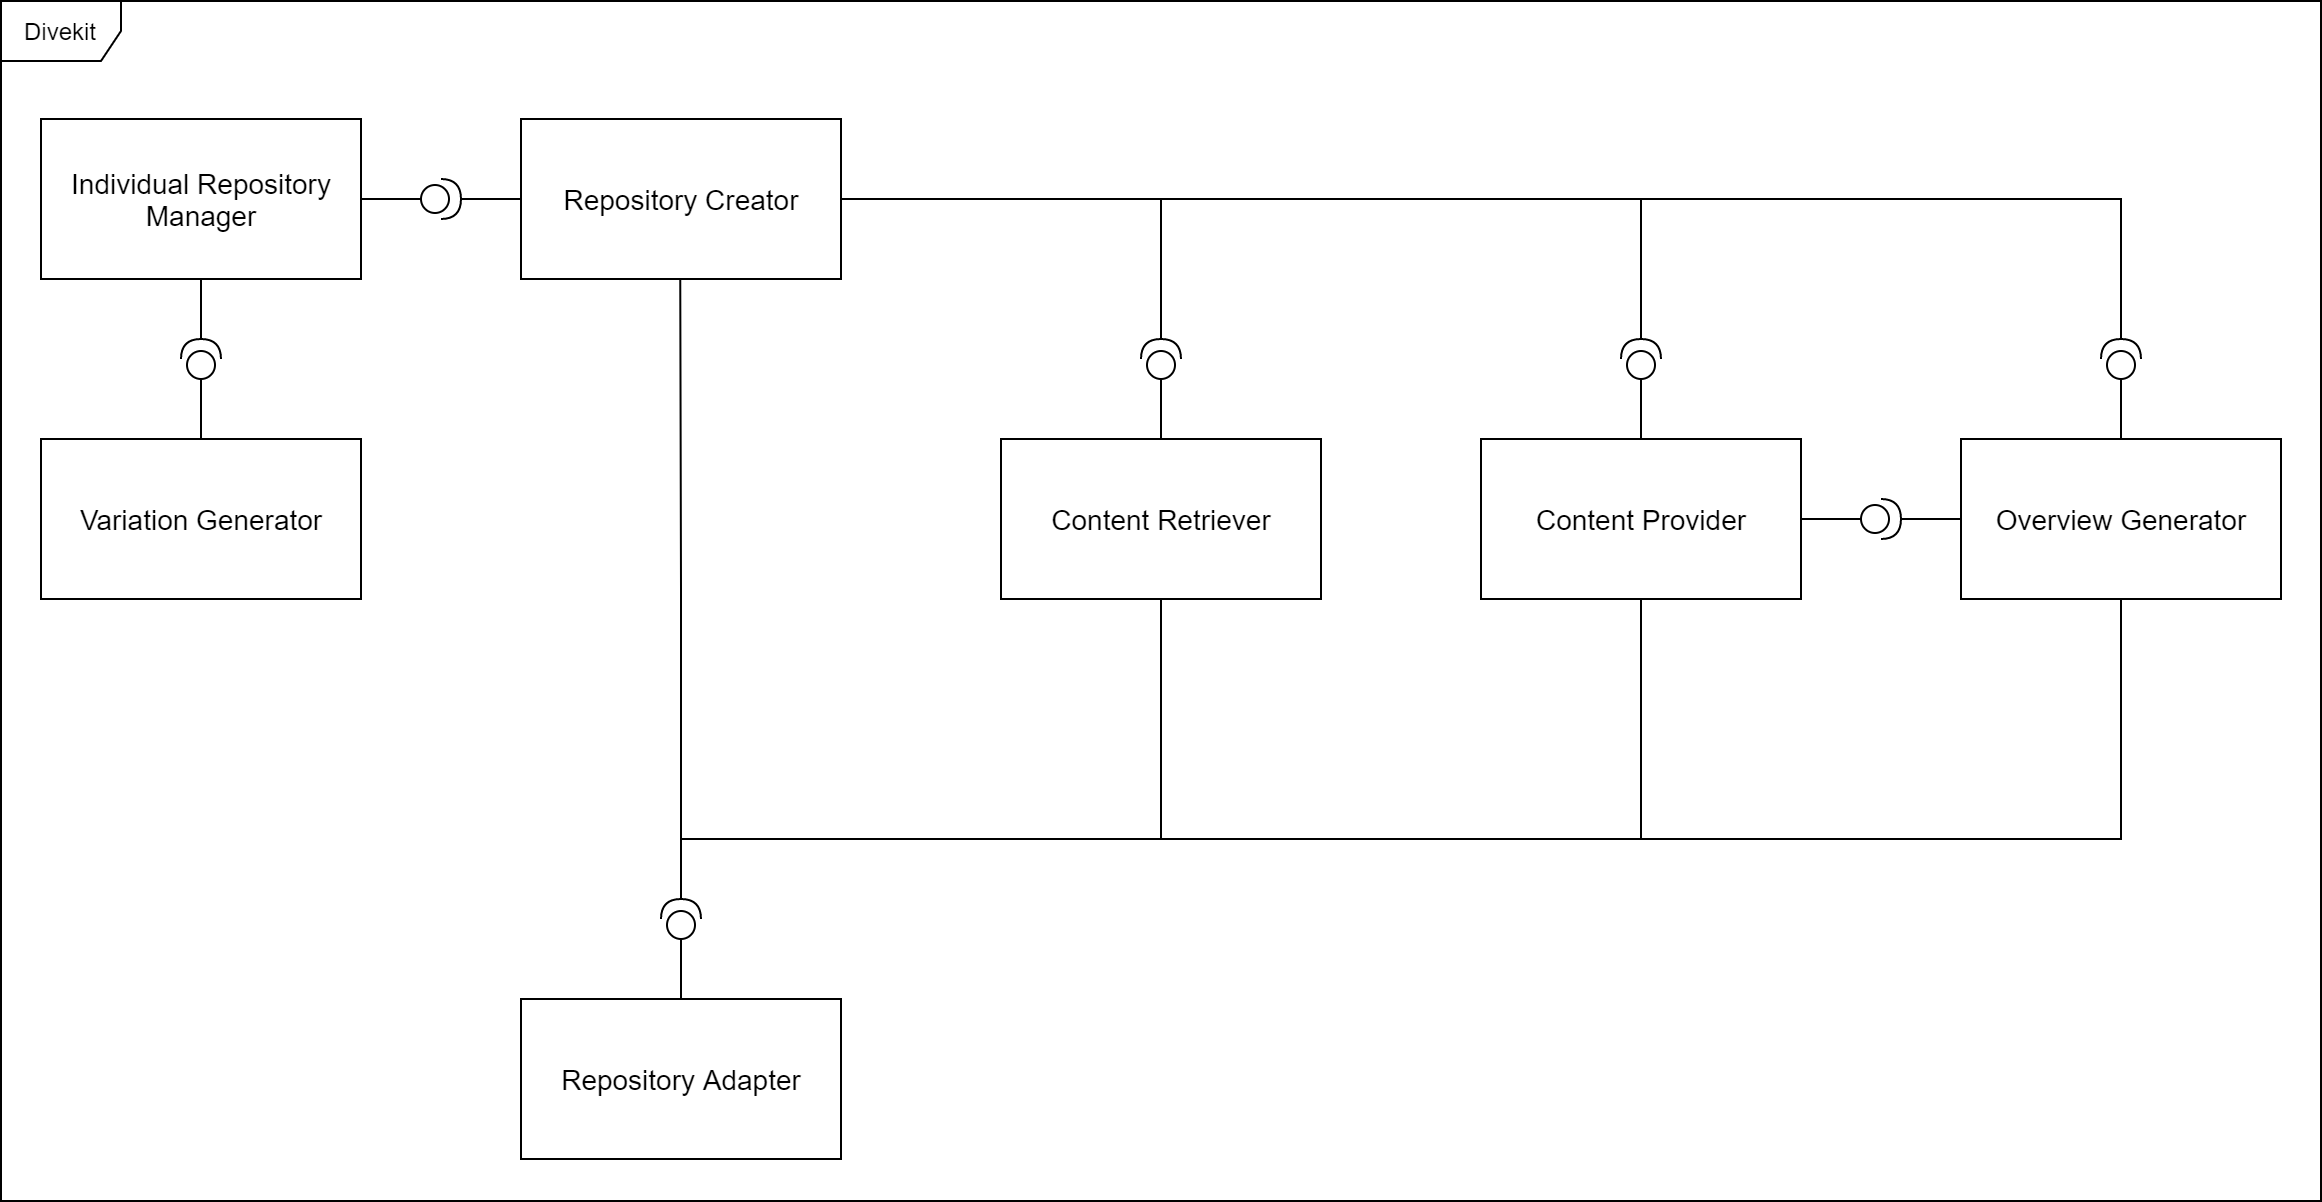
The component diagram above shows the components of the Divekit which are used in the process of generating and individualizing repositories. In the following the repository generation process will be explained step by step and the components relevant in each step are described:
The Repository Creator delegates most of the tasks involved in the repository generation process to other components. Before repositories are generated the Repository Creator calls the Repository Adapter to prepare the environment. This includes for example creating empty folders for repositories or deleting previous data which is contained in the destination folder. A Repository Adapter functions like an interface to the environment in which new repositories are being generated. At the moment there are two kinds of Repository Adapters: One for the local file system and one for Gitlab.
The Content Retriever retrieves all files from the configured origin repository. In order to access the origin repository the component will use a Repository Adapter. If solution deletion is activated the solution which is contained inside the origin repository will be deleted inside the retrived origin files (not in the origin repository).
For each configured repository or learner a specific configuration is generated by the Individual Repository Manager. This configuration is used by other components while generating repositories and contains for example a unique id and the usernames of learners. If individualization is activated for each configuration specific variations and corresponding variables are generated by the Variation Generator. These variations and variables will also be contained in the seperate configurations which are generated by the Individual Repository Manager.
For each repository configuration generated by the Individual Repository Manager in the previvous step a Content Provider is instantiated. After varying the content by using the randomly generated variations from the previous step the defined File Manipulators (File Converters) are executed. Finally the resulting files are pushed to a new repository using a Repository Adapter.
After all Content Providers are finished with generating each corresponding repository the Overview Generator collects basic information from the Content Providers and generates an overview of all links leading to Code Projects, Test Projects and Test Pages.
The following table lists the relevant packages inside the codebase for each component:
| Component | Relevant Packages |
|---|---|
| Repository Creator | repository_creation |
| Individual Repository Manager | repository_creation |
| Variation Generator | content_variation |
| Content Retriever | content_manager, solution_deletion |
| Content Provider | content_manager, content_variation, file_manipulator |
| Overview Generator | generate_overview |
| Repository Adapter | repository_adapter |
Design-Decisions
| Design-Decision | Explanation |
|---|---|
| Typescript chosen as programming language | Easy handling of dynamic json structures, Good API support for Gitlab, Platform independent, Can be executed locally with nodejs |